We just finally did it. The Imagewize Migration is a fact! Imagewize has become IMWZ starting today. We have been thinking about a rebranding for quite some time, but we are finally taking steps. Today we migrated https://imagewize.com to https://wpvilla.in. And I must say it went pretty smoothly. Let us tell you how we did the WordPress Migration so you can learn from this.
Background
You must know that we moved to DreamPress, Managed WordPress hosting with Dreamhost. It is an amazing setup to run your WordPress business and I will highlight features ast the end of this post. There was one issue we bumped into as was due to WP Rocket DreamPress compatibility issues with DreamPress. This as the latter works with Varnish caching. So this is something you may no run into, but the rest is very similar to most WordPress migrations.
BackupBuddy Backup
We used BackupBuddy to backup the site and migrate it from the Dashboard to the new location. That saved us time using SFTP to SFTP everything to our local PC and then again to the new location. Both locations are in the US and from Bahrain using my meager Batelco ADSL here at Amwaj Islands would have been a massive PITA.
Wordfence Firewall Issues
We did run into one issue with Wordfence. We blogged about the fact that BackupBuddy and Wordfence do not like each other much before. It spoiled the database migration completely. As soon as the necessary files were unzipped we had a JSON error. One I could not just copy as it was in a BackupBuddy warning backup:
Error #839983: Failure parsing returned server data. SEe Status log for more details: `Unexpected token < in JSON at position 0`.
Resonse: `<br />
<b>Warning</b>: Unknown:Failed to open stream. Permission denied in
<b>Unknown<b/> on line <b>0</b><br />
<b>Fatal error</b>: Unknown: Failed opening required '/home/imgvps/imagewize.com/wordfence-waf.php'
There was an error because Wordfence was trying to load wordfence-waf.php from old server. Had to deactivate and remove Wordfence, empty cache before I could rename the file. Not sure if plugin removal was needed though, but did anyways. Just renaming wordfence-waf.php or .user.ini did not do the trick. Could have been a caching issue though. But hey, I would recommend removing Wordfence before you move. Or you will get stuck just like me.
301 Redirect from old to new domain
All our visitors and clients trying to reach us at the old website will be properly redirected to the new domain name. This we did with a fairly standard Apache redirect at the top of the .htaccess file:
#Options +FollowSymLinks
 RewriteEngine on
 RewriteRule ^(.*)$ https://.wpvilla.in/$1 [R=301,L]
As we only change the domain and not the permalinks the redirect RewriteRule was pretty straightforward. We will remove the site at the old domain as soon as we can. Will also allow us to reduce the VPS intake of RAM and save us some $.
The new problem I faced was this: we were redirecting the old site because we changed our name (and with it, our domain). While we’ve tried to let all our existing customers know about the name change, we still want to redirect the old site to a specific page of the new site designed to let them know that we are still the same people doing the same thing (so they would not think we had been acquired or otherwise changed).
Feedback Reader
Feedback from read of this post Bill Weber @ https://growthpilot.com/ on a related redirect issue I decided to add here for now. If I do find another post it was more about I will move this piece to that post.
With the code you provide in your post, it redirected perfectly to the page we wanted IF you tried to access the primary .com home page of the old site, but redirected to the home page (rather than the desired page) of the new site if they tried any other link on the old site.
After another hour or so of fruitless searching, I finally figured out that I simply needed to remove the trailing “$1” in the last line of your code to get the behavior I was looking for: all pages on the old domain forwarding to a single page (not the home page) on the new domain.
The very slight modification I did to what you provided is below:
RewriteEngine On
RewriteCond %{REQUEST_URI} !^(.)?wp-login.php(.)$
RewriteCond %{REQUEST_URI} !^/wp-admin
RewriteRule ^(.*)$ https://newsite.com/desired-landing-page/ [R=301,L]
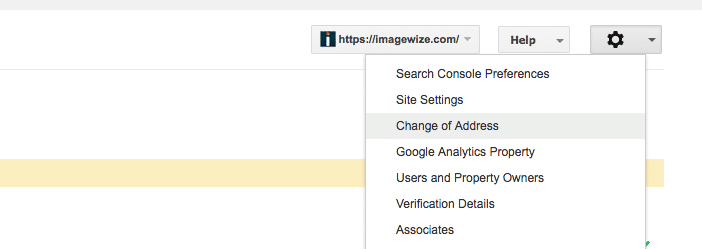
Google Webmaster Tools Change of Address
You can also tell Google that you have moved. For the property that has changed address you can register just that. Click on the top right button to register the change.
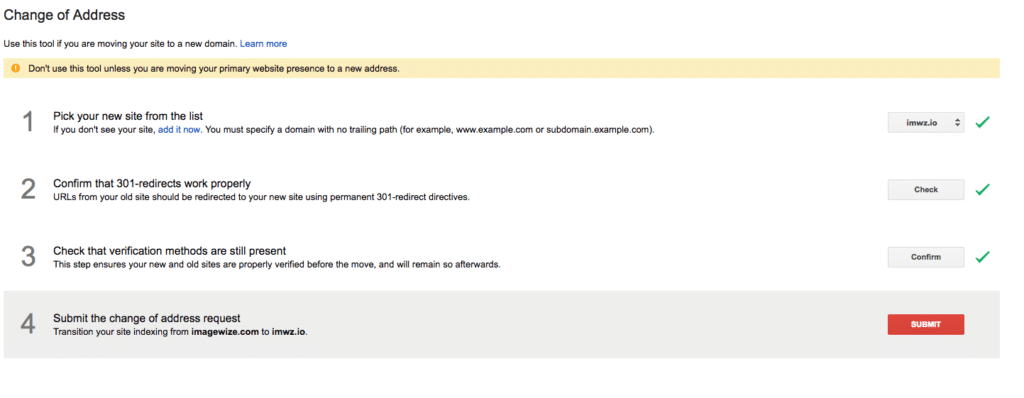
After that you can follow the steps below and:
- pick the new domain,
- confirm the 301 redirects properly
- check that the verification code still works properly
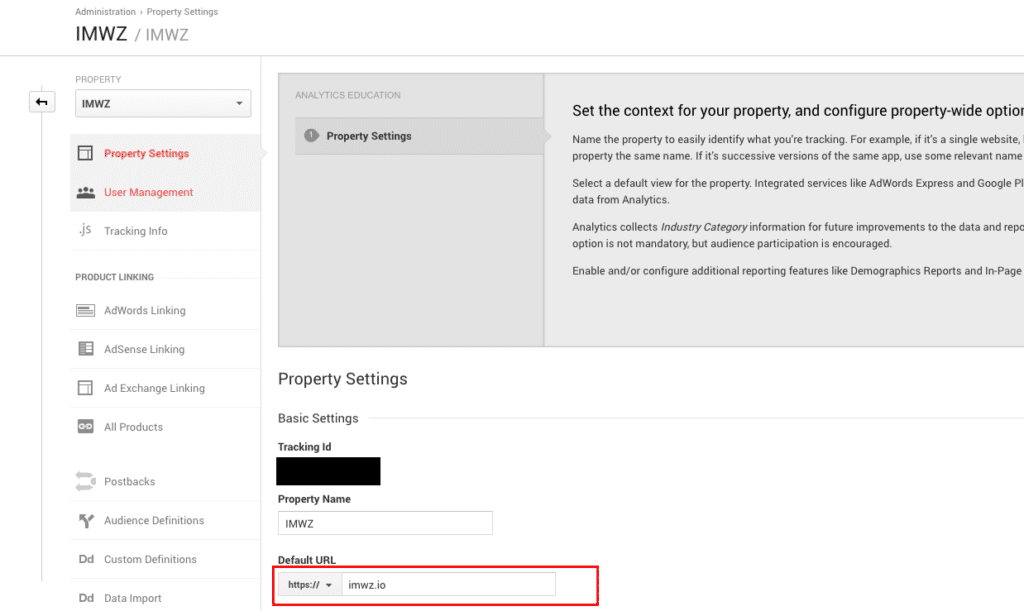
Google Analytics Property & View Changes
Do not forget to update your Google Analytics property and view settings. These need to use the new url as well. Otherwise you will see a quick drop in traffic post domain name migration. We did it by going to the Google Analytics account in question. There under admin you can change the url for the property and for the view(s) you have.
Google Analytics Filters Check
Please be certain to change your filters if you have additional views with filters like a valid hostname filter. Otherwise it will not register any visitors as it will not accept the new domain name. We now have:
imwz\.io|cdn\.imagewize\.com
but had the first filter hostname as imagewize.com and had not adjusted it right away. Fortunately we have multiple views so we still had data, but lost some for this spam free view. The second allowed host is for our CDN. We may adjust the name there, but we will keep it for now.
WP Rocket Compatibility
To make WP Rocket Cache work properly with DreamPress Varnish we did need to activate a separate plugin provided by WP Rocket. This plugin had to be added to
- be able to empty Varnish cache on emptying cache using WP Rocket,
- remove Varnish removal as an option as it is no longer needed,
- ensure minification compatibility and
- remove the HTML expires rules from .htaccess
DreamPress Goodies
The additional advantage we have now is that we were now part of a Dreamhost one-click installation. So we were able to move over to DreamPress. It is really amazing. It allows you to focus on your site and let them manage core updates, server updates. And this with a setup with one server for files, one for the database and one for Varnish caching.
Design Changes
We will be replacing the logo and favicon this week. Just some final tweaking to do so to speak. The weekend was good for a migration so we went for it. We promise you will see a new shiny logo and favicon soon. This besides the new icons for social media. The Facebook Page has been renamed already, but will get a facelift too as soon as the design part is done.